Styled and Savored #024
Your weekly curated guide to great finds that make your home life easier, fuller, richer, and happier.
This week, Styled & Savored is all about making life a little cozier, a lot smarter, and undeniably stylish. We’re solving design dilemmas like how to put a bed in front of a window without breaking any “rules” (hello, Emily Henderson-approved low-profile beds and curtain tricks), and keeping your neck happy with the right TV-mounting heights courtesy of Homedit. For a touch of real estate envy, we’re touring a jaw-dropping $2.68 million converted barn in Villanova, complete with a saltwater pool and open, airy luxury that’s equal parts rustic charm and high-end living.
Green thumbs, rejoice: we’re digging into perennials that keep on giving, from lavender and mint to strawberries and asparagus — plant once, harvest for years, and skip the garden guilt. DIY lovers get a seasonal glow-up with chinoiserie-inspired pumpkins, while arcade aficionados learn how to dominate the claw machine like a strategic pro. And for those who like to sip, cook, and snack in style? We’ve got mulled spice magic from A Beautiful Mess, cast-iron skillet perfection with steak and fried apples, and all the cozy flavors to make your kitchen (and life) feel extra indulgent. Short version: design, décor, food, fun, and a little flair — all in one stylishly sassy package.
Rules for putting a bed in front of a window
This one’s a game-changer for anyone who’s been side-eyeing that awkward bedroom layout.
Putting a bed in front of a window feels like one of those design crimes HGTV would scold you for — right up there with popcorn ceilings or carpet in the bathroom. But Emily Henderson comes in swinging with the big reveal: it’s not only allowed, it can actually look amazing… if you follow a few golden rules. So yes, you can reclaim that “tricky room” where the only wall big enough for your bed just happens to come with a window. Emily says embrace it, don’t fight it.


First rule? Keep it low. If you’re shoving a four-poster bed in front of your window, congrats, you’ve just built a wall where a window used to be. The article advises going with a lower-profile bed frame or headboard so the light still flows in. Upholstered headboards, simple frames, or even no headboard at all can work here. It’s all about letting the window breathe while still making your bed the star of the room.
Next up, frame it right. Curtains are your secret weapon. By hanging them higher and wider than the window, you create the illusion of a larger, more balanced wall. The bed blends with the window treatment, instead of looking like it’s fighting for space. Pro tip: use the curtains to create a symmetrical, cozy backdrop so the bed looks intentional, not like it got shoved there as a last resort.
Then comes the styling magic: layer it up. Think throw pillows, cozy bedding, maybe even a blanket that ties in with the curtain color. The post shows examples where the bed and window setup looks straight out of a design magazine — not because the window disappeared, but because the bed became part of the frame. Bonus points if your bed sits in front of a big, beautiful window view. Nothing says “morning goals” like waking up with natural light flooding in.
The takeaway? A bed in front of a window doesn’t have to be a design disaster. With the right height, curtains, and cozy styling, it can feel deliberate, polished, and totally livable. It boils down to this: stop stressing about “breaking the rules.” Design isn’t about rules. It’s about making your space work for you, and sometimes that means your bed goes in front of a window, and it looks darn good doing it.
How High Should You Mount Your TV?
Let’s talk TVs, because if there’s one thing guaranteed to start a household feud, it’s how high that big flat-screen should hang on the wall. The Homedit article gets real about the do’s, don’ts, and the math behind keeping your neck intact while binge-watching. Spoiler: if you’ve ever tilted your head back so far you felt like you were in the front row of a movie theater, you’re doing it wrong.


First things first: eye level is king. Homedit says the sweet spot for TV height is making sure the center of the screen lines up with your eyes when you’re sitting down. For most people, that means about 42 inches from the floor to the middle of the TV. Simple, right? Except real life isn’t simple. Your sofa might be low-slung, your sectional might sit high, or your recliner might lean you back like you’re in orbit. That’s why they stress taking actual measurements from your furniture instead of following some cookie-cutter rule.
But what about that oh-so-tempting fireplace mantle? We’ve all seen it on Pinterest: a roaring fire below, a sleek flat-screen above. Homedit politely bursts that bubble. Mounting a TV too high — especially above a mantle — means you’re craning your neck for hours. Not only is it uncomfortable, but it also ruins picture quality because you’re watching at an angle. If you absolutely must go above the fireplace, the article suggests a tilting wall mount to angle the screen downward. Otherwise? Skip the neck strain and mount it lower.
Another juicy detail: TV size changes the game. A petite 32-inch can handle a slightly higher mount without issue. But if you’ve got a 65-inch beast on the wall, a few inches too high makes a huge difference. Homedit even includes a handy little chart that matches TV size with recommended mounting heights, reminding us that bigger isn’t always better… unless you hang it right.
And don’t forget the room’s purpose. Mounting height in a family room where people sprawl on sectionals? Totally different from a bedroom setup, where you might watch lying down. Homedit encourages thinking about how you actually use the room before drilling holes into the wall. Their bottom line: your TV should feel natural to look at, not like a neck workout or a strained compromise with your spouse.
So, the golden rule? Sit where you’ll usually watch, measure your eye level, and let that dictate the mount height. It’s practical, it’s comfy, and it saves you from years of chiropractor bills. .
$2.68 Million Converted Pennsylvania Barn on 2.65 Acres
Once upon a time in Villanova, Pennsylvania’s posh estate section, somebody looked at a 1930s barn and thought, “You know what this needs? A glow-up.” Fast-forward, and now it’s a jaw-dropping $2.68 million showpiece sitting pretty on 2.65 acres. The exterior still whispers rustic charm with its stone façade, but step inside and you’re in a world of soaring ceilings, exposed beams, and wide-open living spaces that feel equal parts luxurious and livable. It’s country chic, Main Line style.


The main house spreads out to over 5,000 square feet, boasting five bedrooms and five bathrooms that balance elegance with comfort. The kitchen? A chef’s dream, wrapped in sleek finishes with room to actually entertain instead of just pretending you like your guests while bumping elbows. From the oversized windows flooding everything with natural light to the cozy stone fireplaces that practically demand a glass of wine and a good book, this place was clearly designed to impress without ever feeling stuffy.
But let’s not forget the supporting cast of amenities. Out back, things get seriously glamorous with a saltwater pool that makes chlorine feel like last season’s news. Surrounded by lush landscaping, it’s not just a pool — it’s a statement. Add in multiple terraces and patios that beg for summer parties, and you’ve got an outdoor setup that basically doubles as your own private resort. Whether you’re grilling, lounging, or cannonball-ing, it’s all good vibes.
And yes, there’s even more. A three-car garage means plenty of space for toys (cars, bikes, or otherwise), and the whole property offers a perfect balance between secluded retreat and convenient access to the best of Villanova’s estate living. It’s rustic bones meet refined living — the kind of place that says, “I’m casual, but also, please note the price tag.” For anyone who’s ever dreamed of blending farm charm with Main Line sophistication, this converted barn is the ultimate fantasy brought to life.
The power of planting perennials
If you’re tired of planting, replanting, and doing the “why did I kill last year’s basil?” dance, this post is your new gardening mantra: plant once, harvest for years. Crafty Little Gnome walks you through five perennials that deliver big returns over seasons without the annual reset hustle. It’s garden investment talk—minus the financial guilt.

Lavender
First up: lavender. Not just for sachets and eye-rolling spa menus — this post reminds us that culinary lavender is totally a thing (just choose a “culinary variety,” please). Lavender likes 3–4 hours of sun, loves well-draining soil, and will grow a couple of feet tall, so don’t confine it to a windowsill unless you want it to rebel. If you don’t use it for cooking, dried lavender makes dreamy drawer sachets.
Then we get into strawberries – the childhood nostalgia hero. They do beautifully in hanging baskets or containers, though ground planting gives you more yield. If your plant looks “dead” in winter, no panic – it’s just dormant. A layer of straw or mulch helps them survive, especially in colder climates. Move them indoors into a garage if needed when they sleep through cold snaps.
Lettuce is the low-drama pick. Plant it in the spring or autumn, keep the soil moist, mulch to suppress weeds, and harvest outer leaves so the inner ones keep growing. It tolerates partial shade and gives fast rewards for low effort.
Next: mint – the “too good to lock outside” plant. Mint is famously aggressive, so the post warns to contain it (pots are your friend) or trim often. It thrives with morning sun, afternoon shade, and soil that doesn’t go full Sahara on it. Use that mint to garnish drinks, flavor dishes, or feel fancy just by planting it in your yard.
Finally, asparagus enters as the long game champion. Once you plant crowns (or start from seed, if you’re patient), asparagus can yield for over a decade. It likes well-drained, slightly alkaline soil, and the female/male distinction matters: male plants produce more spears, while females get distracted with berries. The harvest begins in Year 2 (if you started from crowns) – snap it off at the base and let the woody ends hang back.
The post circles back to one core message: these perennials are not just economical, they’re rewarding. Whether you grow them in beds, containers, or window planters, you’ll get ongoing harvests without planting every year. Step outside, clip what you need, and skip the grocery-store guilt trip.
An elegant DIY Chinoiserie-inspired pumpkin craft project
Who doesn’t love a craft project that makes your house look like a designer boutique without the boutique price tag?

© Alice & Lois
This is not your average “slap some orange paint on a pumpkin” craft. Nope – this is chinoiserie-inspired pumpkin glam from the Alice & Lois blog, where your gourds get dressed up like they’re about to sip cocktails in a blue-and-white porcelain vase. The article walks us through an easy, eye-catching project that’s part Halloween, part timeless home décor. The magic ingredient? Blue-and-white printed napkins that mimic that iconic chinoiserie vibe.
The supply list is short and sweet: napkins, Mod Podge, foam brush, and pumpkins (faux or real, your choice). First, you peel the top printed ply off the napkins (napkins are sneaky and usually have multiple layers), then tear them into small pieces. The tearing – not cutting – is intentional, because those raw edges blend better when layered.
From there, it’s basically a Mod Podge spa day for pumpkins. Apply a layer of Mod Podge with your foam brush, lay down a napkin piece, and smooth it on with more Mod Podge. Rinse and repeat until the pumpkin is fully covered. Overlap pieces as you go so the patterns look seamless. It’s not about perfection here—the more layered, the more it mimics that painted porcelain look.
The final result? A pumpkin that looks like it belongs in a chic living room vignette, not a hay bale stack at the pumpkin patch. These are the kind of gourds that can stay out well past Halloween – into Thanksgiving, even – and still look classy. The post shows examples of the pumpkins styled on shelves and tables, and honestly, they look less “craft day mess” and more “home magazine centerpiece.”
What makes this project a keeper is its versatility. You can play with different chinoiserie-style napkins, try it on big or small pumpkins, and even mix them in with plain white gourds for a whole curated display. It’s quick, it’s inexpensive, and it screams “effortless hostess with taste.” In short: it’s your seasonal décor glow-up in under an hour.
Mastering the claw machine arcade game
First off, let’s face it: the claw machine is basically the arcade’s version of a confidence test. The Art of Manliness lays it all out with a wink, reminding us that this “game” is less about luck and more about strategy, precision, and maybe just a little ego. It’s not just about flinging quarters at plush toys; it’s about understanding how the machine actually works.

© Art of Manliness and Ted Kinyak
Click image for complete instructions
Next, the post breaks down the mechanics of the claw. Did you know that most claws are programmed to grip weakly most of the time, only giving a strong squeeze sporadically? That means winning isn’t just about aim – it’s about knowing when the machine is feeling generous and when it’s basically trolling you. Understanding claw timing, drop zones, and how plush positioning affects success is key. The article delivers this with a mix of humor and practical insight, so you’re laughing while scheming your plush heist.
Then comes the strategy play. The post offers tactical advice: scope out the machine first, test the claw on cheaper toys if you can, and target items near the chute for easier grabs. It’s all about patience and observation, none of that wild flail-and-pray nonsense. Plus, the post highlights the psychological side: the longer you watch, the more you notice patterns and quirks that the casual player misses.
Finally, there’s a gentle reality check wrapped in charm: claw machines are designed to be tough, so don’t get bitter when plushies slip away. The joy comes from mastering the art, celebrating small wins, and maybe bragging to your friends about that one epic grab. The post blends practical how-to tips with a wink, reminding us that a little knowledge and finesse can turn a frustrating game into a triumph.
The takeaway? Approach the claw like a pro – observe, plan, and execute with patience. And if you don’t snag the prize? At least you’ll look like a master strategist while everyone else flails blindly.
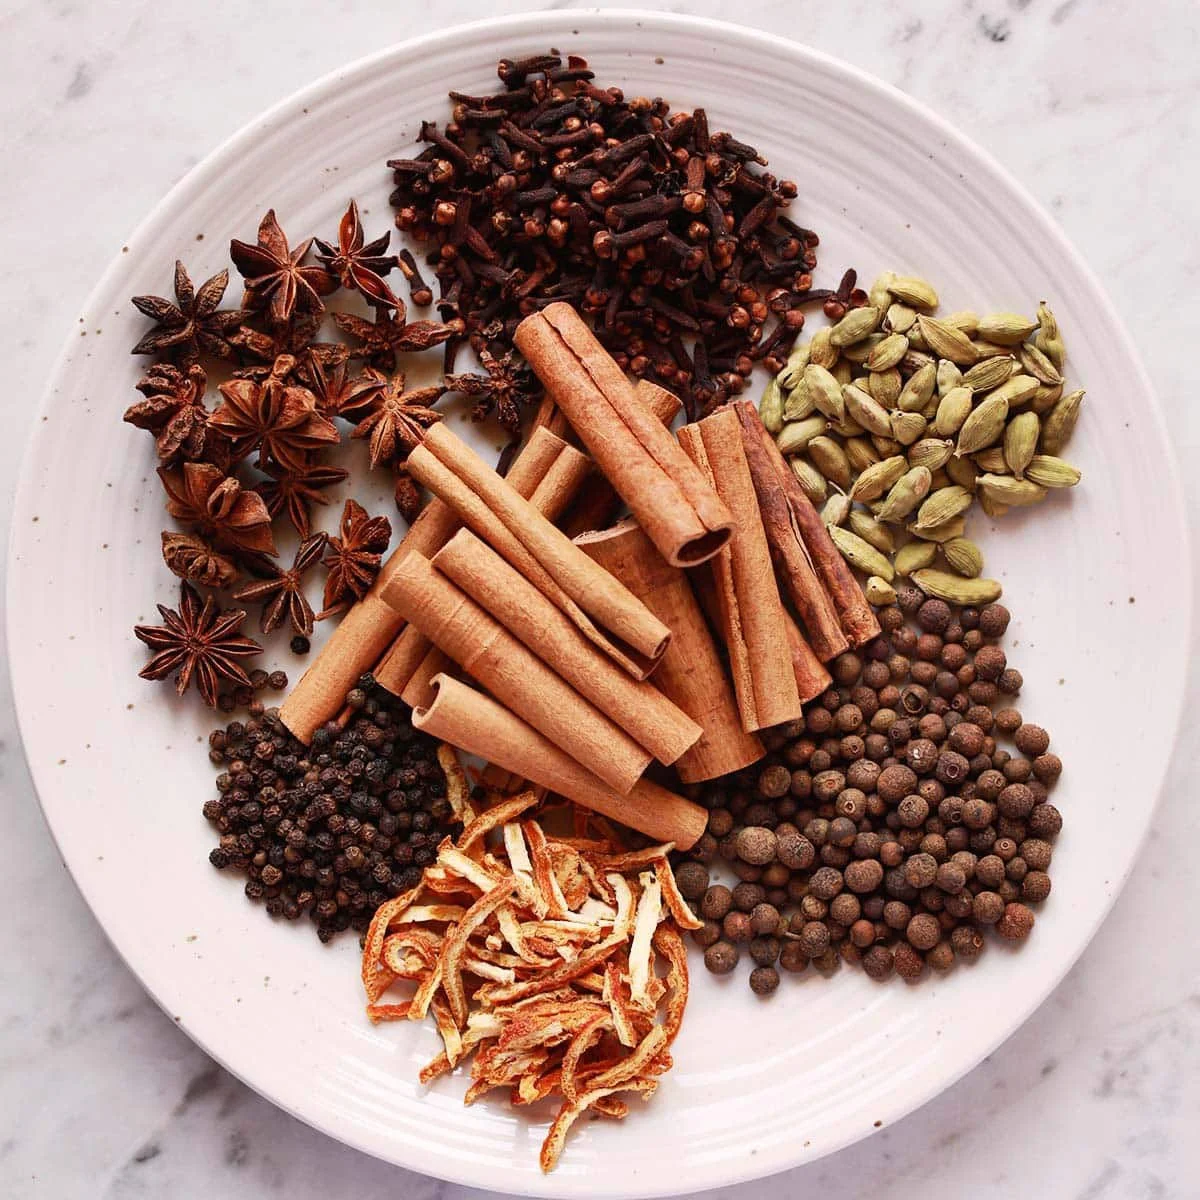
Cozying up to mulling spices
Let’s cozy up with A Beautiful Mess and their guide to DIY mulling spices, because nothing says fall like turning your kitchen into a Hallmark movie set with one simmering pot. Here’s your detailed, sassy breakdown:
Forget overpriced scented candles – the article shows you how to make your whole house smell like autumn because nothing says fall like turning your kitchen into a Hallmark movie set with one simmering pot.. The secret weapon? Mulling spices. These little bundles of joy aren’t just for warming wine; they double as natural air fresheners and charming homemade gifts. It’s basically fall in sachet form, ready to be tossed into whatever you’re sipping or simmering.
© A Beautiful Mess
The base mix is what you’d expect from cozy fall flavors: cinnamon sticks, cloves, allspice berries, and orange peel. That’s the quartet that sets the scene, but you can jazz it up with extras like cardamom pods or star anise if you’re feeling fancy. The point is balance – you want warmth and spice without making your drink taste like you just gnawed on a potpourri ball.
Once the spices are prepped, you can use them in a couple of clever ways. Drop them directly into simmering wine, cider, or even cranberry juice for instant cozy vibes, or tie them up in cheesecloth like little spice presents so you don’t have to fish out stray cloves later. It’s minimal effort with maximum payoff – you’re basically one saucepan away from impressing your guests, your in-laws, or just yourself on a Tuesday night.
The blog also leans into the giftable angle, because let’s be real, who wouldn’t want to get a cute jar of mulling spices tied up with ribbon instead of yet another generic candle? They’re thoughtful, seasonal, and don’t require you to be Martha Stewart to assemble. Stick a label on, add brewing directions, and boom — you’ve nailed holiday hostess gifts without breaking a sweat.
The overall takeaway? Mulling spices are ridiculously easy, endlessly versatile, and downright magical in how they transform a plain bottle of wine or jug of cider into something that feels festive. They’re the ultimate fall/winter hack – part kitchen project, part aromatherapy, and part cozy cocktail starter kit. It’s like bottling the holidays and sprinkling them wherever you go.
The cast iron skillet gives steaks a delicious crust
First things first: cast iron is your new BFF. This Girl Carnivore post walks you through why this pan is basically the superhero of steak cooking — it holds heat like a champ, sears like nobody’s business, and gives that gorgeous, caramelized crust that makes meat look so good you’ll want to frame it. No fancy gadgets, no gimmicks, just classic, old-school heat management.

© Girl Carnivore
Next up: seasoning and prep. The beauty here is simplicity. Salt. Pepper. Maybe a dash of garlic if you’re feeling cheeky. The post emphasizes letting your steak come to room temperature first – no one likes a chilly center – and patting it dry so the sear really pops. It’s like giving your steak a spa day before the big performance.
Now we get to the hot and heavy action. Preheat that skillet until it’s screaming, lay your steak down, and resist the urge to constantly flip. The post stresses patience – let that crust develop, let the sizzle do its thing. Depending on thickness and preferred doneness, timing is everything here. And don’t skip the basting with butter, garlic, and herbs at the end. It’s a flavor mic drop.
After cooking, the post reminds you to let it rest. Yes, even the most impatient carnivores must wait. This keeps juices locked in and ensures every bite is tender and juicy.
With a trusty cast iron skillet, a little patience, and some basic seasonings, you can take your steak game from “meh” to “mouthwatering masterpiece.” No fuss, no fancy gadgets, just pure, savory satisfaction.
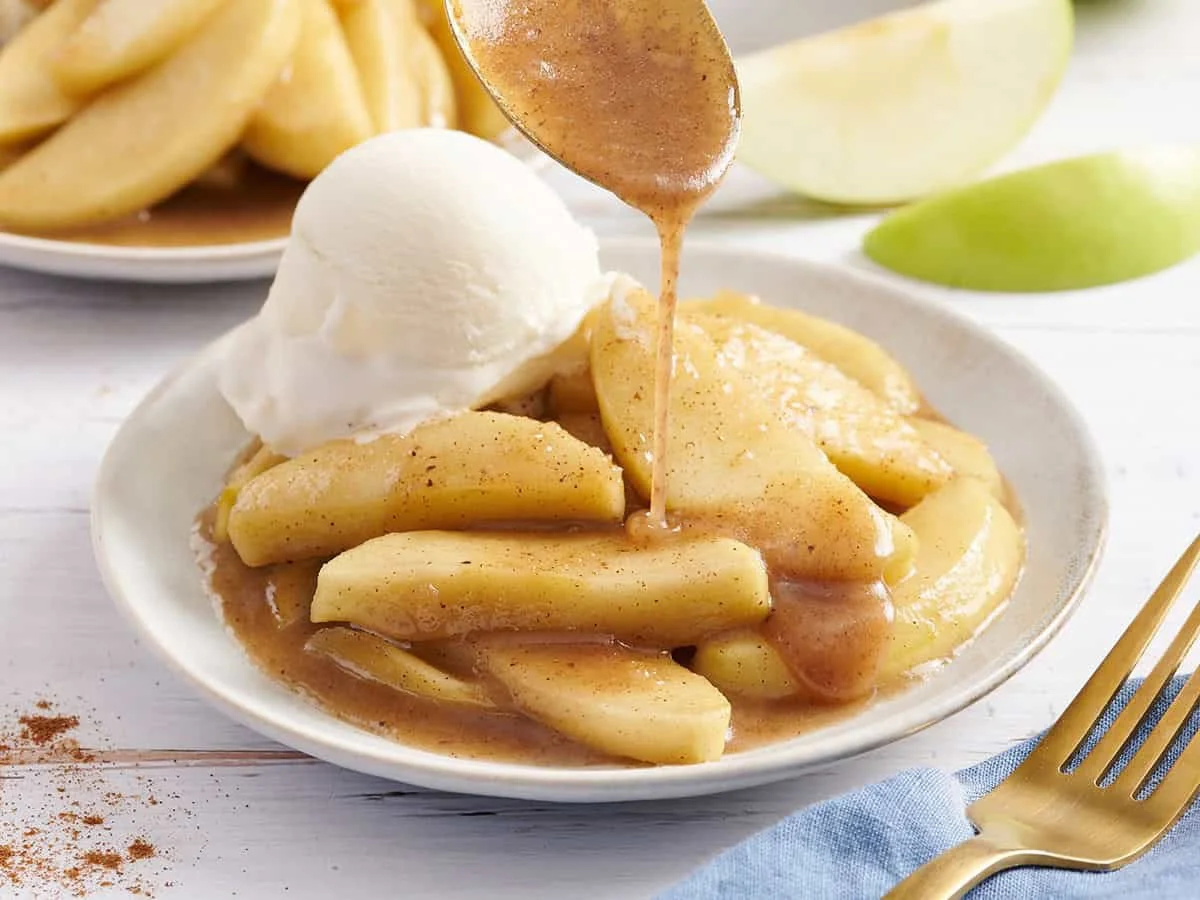
Repeat that: Cast iron skillet fried apples
Let’s talk cast iron magic again – because if your skillet is already sizzling from steak glory, why not let it moonlight as the stage for sweet, caramelized apples? Budget Bytes leans on the trusty skillet to deliver even heat, golden caramelization, and that slightly crispy edge that makes fried apples basically addictive. It’s like your favorite pan is getting a second encore, and everyone’s invited.
© Budget Bytes
The recipe calls for just apples, butter, sugar, cinnamon, and a pinch of salt. Nothing fancy, nothing intimidating, but everything you need for that warm, cozy, slightly-spiced apple goodness. Budget Bytes makes it clear: the focus here is flavor, not fuss. Slice your apples evenly, because consistent pieces mean consistent caramelization – and no one wants half-burnt, half-soggy apples sulking in the skillet.
Then comes the sizzle and swirl. Melt butter in your cast iron, toss in the apples, and sprinkle sugar and cinnamon. Stir occasionally, but don’t overdo it. We want tender, slightly crispy edges, not mushy apple mush. As the apples caramelize, the kitchen fills with that irresistible, “is it dessert yet?” aroma. The post even highlights how patience here pays off: let the sugar work its magic, and don’t rush that caramelization.
Finally, the finishing flourish. Taste, tweak with a pinch more cinnamon or sugar if desired, and serve while warm. These fried apples are perfect on their own, over pancakes, or alongside ice cream – anything that deserves a cozy, sweet companion. Budget Bytes keeps it approachable, comforting, and decidedly delicious.
Just like with the steak, your trusty skillet is the unsung hero here, transforming humble apples into golden, caramelized perfection. Simple ingredients, patient technique, and a little skillet love = fried apples you’ll want to make on repeat.
Apple crumble bourbon cocktail
This cocktail from @YellowBellyKelly on Instagram, is Fall in a glass, y’all! If you love apple desserts, this drink hits all the cozy notes – plus, it’s perfect for shaking up a big batch for your autumn shindigs.
You’ll need:
1.5 oz bourbon
2 oz apple cider
0.5 oz butterscotch schnapps
0.5 oz maple syrup (adjust for sweetness, or skip if you’re feeling spicy)
0.75 oz fresh lemon juice
3 dashes black walnut bitters
Dash of cinnamon
Rim: maple syrup + brown sugar cinnamon
How to: Shake all your liquid gold with ice for 10 seconds. Rim a rocks glass with maple syrup + brown sugar cinnamon, fill with ice, and strain that autumn magic over top. Garnish with an apple wheel and a cinnamon stick, then sip and pretend you’re in a cozy leaf-strewn cabin (or just your living room. We won’t judge).
Quote of the week: Appreciating your blessings
Taking a moment to appreciate your blessings is like giving your heart a little boost of gratitude. It shifts focus from what’s missing to what’s abundant. Recognizing the people, experiences, and small joys in your life fosters contentment, strengthens relationships, and cultivates a positive mindset. It helps put challenges in perspective, reminding us that even during tough times, there’s something to be thankful for. Simply put, appreciating your blessings turns everyday moments into little celebrations of life.
“Reflect on your present blessings, of which every man has many; not on your past misfortunes, of which all men have some.”
– Charles Dickens (1812 - 1870), 19th-century English novelist and social critic, famous for his vivid characters, intricate plots, and works like A Christmas Carol and Great Expectations that highlighted Victorian society and its inequalities
That’s it for this week. Let us know your thoughts about any or all of the featured posts in this edition of Styled & Savored, and tell us what you’d like to see us cover in future editions as well.